Choose which notifications everyone gets and how, monitor delivery on the Notification Dashboard, and edit the templates that shape notification emails.
ComplyTrain notifies people when something needs their attention, for example a task assigned to them, a CAPA that has escalated or a document waiting for approval. An organisation Admin decides the defaults for everyone, checks that notifications are being delivered, and can reword the emails. Only Admins can open the pages in this topic.
Each person reads their own notifications and can adjust their own preferences; see Read your notifications and choose how you get them. To forward notifications to Microsoft Teams, Slack or another system, see Send notifications to Teams, Slack or other systems.
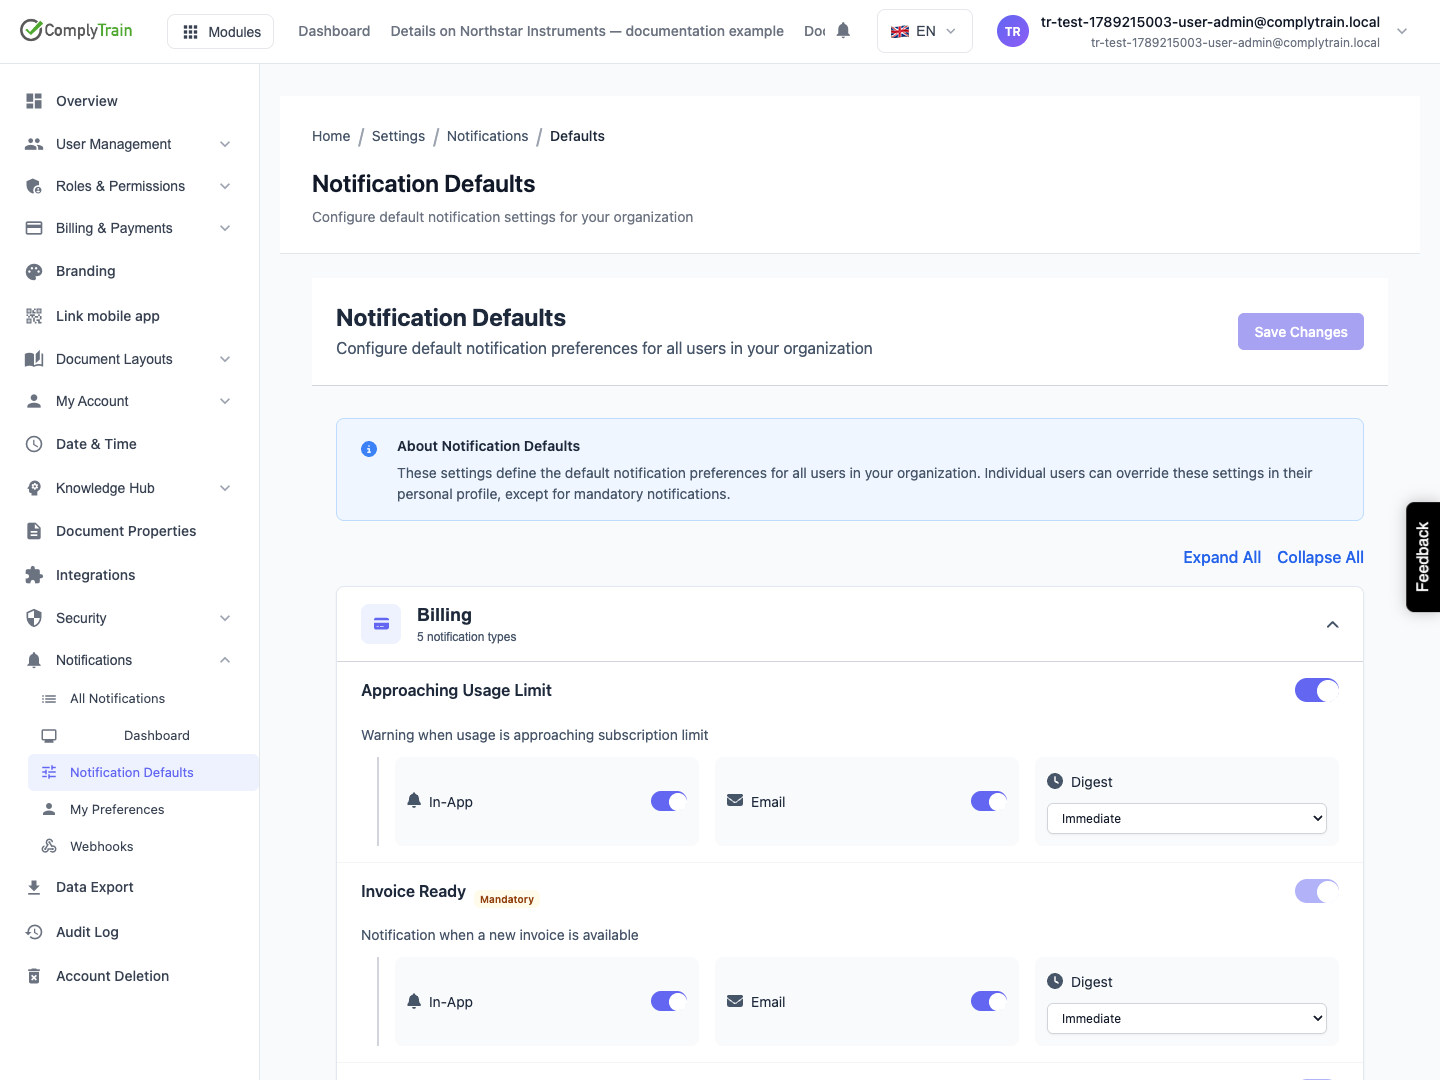
Product location: /settings/notifications/defaults. Open Notifications, then Notification Defaults, in Settings.
Open Settings, then Notifications, then Notification Defaults.
Notification types are grouped into Security, Billing, Workflow, System and User. Each group shows how many types it holds. Select a group to open or close it, or use Expand All and Collapse All.
For each type, set the switch next to its name, then choose its channels.
Select Save Changes. The button shows how many types you changed. Cancel discards all unsaved changes.
Control | What it does |
|---|---|
Switch next to the type's name | Turns the notification type on or off for the organisation. When it is off, the type shows This notification type is disabled. Enable it to configure delivery channels. |
In-App | Shows the notification in ComplyTrain: in the bell menu and on All Notifications. |
Also sends the notification by email. | |
Digest | Appears when Email is on. Immediate sends each email at once. Daily Digest and Weekly Digest collect that type's emails into one digest email per day or per week. |
Mandatory badge | The type cannot be switched off, by you or by any user. Password resets, invoices and payment failures are examples. |
Modified badge | You have changed this type and not saved it yet. |
A type you have never changed uses ComplyTrain's default: switched on, with In-App and Email on and Immediate timing.
Saved defaults apply to everyone in the organisation from the next notification onwards. A person's own choice in My Notification Preferences takes precedence over your default for that person, and they cannot switch off a Mandatory type. Notifications that have already been sent do not change.
A change to a default reaches only the people who follow it. On My Notification Preferences, settings that follow the organisation are marked (default). Someone who has made their own choice for a type keeps it until they select Reset (Reset to organization default) for that type. When you tighten a default, for example to email every CAPA escalation immediately, ask the people concerned to reset that type.
Product location: /settings/notifications/dashboard. Open Notifications, then Dashboard, in Settings.
Open Settings, then Notifications, then Dashboard. The page is titled Notification Dashboard and opens on the Health tab. Manage Defaults opens Notification Defaults, and Manage Webhooks opens Webhooks.
The banner shows the overall Success Rate, meaning sent notifications as a share of sent and failed ones, and Total Notifications, which counts every notification ever created. The banner is green at 95% or more, amber from 80%, and red below 80%. Refresh reloads the figures.
Figure | What it counts |
|---|---|
Queue Depth | Notifications and deliveries still waiting to be sent |
Failed | Notifications and deliveries that failed and have not been delivered |
Sent (24h), Total (24h) | Notifications sent, and all notifications created, in the last 24 hours |
Last 24 Hours, Last 7 Days, Last 30 Days | Total, Sent, Failed and Success Rate for each period |
Channel Breakdown | Total, successful deliveries and Success Rate for Email, Webhook and In-App |
A rising Queue Depth, or a falling email Success Rate, is the signal to look at the delivery log.
Product location: /settings/notifications/dashboard. Open Notifications, then Dashboard, in Settings, and select the Deliveries tab.
The Deliveries tab shows the Delivery Log: one row for each email or webhook delivery attempt, newest first, 20 to a page.
Filter by status: Pending, Sent, Delivered, Failed or Bounced.
Filter by channel: Email, Webhook or In-App.
Each row shows the Channel, the Recipient, the Status, the number of Retries, when it was Created and any Error. Point at a shortened error or recipient to see all of it.
A Bounced email usually means the recipient's address is wrong or their mailbox refused it. Check the user's email address in User Management. A Failed delivery with retries has been tried again automatically. The error text tells you why the last attempt failed.
Product location: /settings/notifications/dashboard. Open Notifications, then Dashboard, in Settings, and select the Notification Log tab.
The Notification Log tab lists every notification ComplyTrain created in your organisation, newest first, 20 to a page.
Column | What it shows |
|---|---|
Type | The group, such as Workflow, and the name of the notification type |
Title | The notification's title |
User | The person it was for |
Channels | Where it was sent, such as In-App and Email |
Priority | Urgent, High, Normal or Low |
Status | Pending, Sent, Failed or Read |
Created | When it was created |
Filter by status and priority with the two lists. To show one type only, type its code in Filter by type..., for example CAPA_ESCALATED, and leave the field. Codes are case-sensitive. The most useful codes are listed in Send notifications to Teams, Slack or other systems.
Use the log to answer "did the system notify this person?". A row with status Read shows the person opened it in ComplyTrain.
Product location: /settings/notifications/dashboard. Open Notifications, then Dashboard, in Settings, and select the Templates tab.
The Templates tab lists the Notification Templates. Choose Email in the channel list to see the email templates: one row for each notification type, with its Subject, Status (Active or Inactive) and Last Updated date. An email template sets the wording of that type's notification emails.
Select Edit on an email template. Editing Template shows the type code and the channel.
Change Subject Template, up to 500 characters.
Change Body Template, up to 50,000 characters. The body is HTML. Unsafe HTML, such as scripts, is removed when you save.
Select Show Preview. Template Preview fills the placeholders with sample values, such as "Jane Smith" and "Acme Corp". A placeholder without a sample value appears in square brackets. Real notifications use real data.
Keep Template is active selected to use the template. Clear it to go back to ComplyTrain's standard email content for that type.
Select Save Template, or Cancel to leave without saving.
Write placeholders in double curly brackets. The editor lists the variables available for the selected type. These generic variables are filled in every notification email:
Placeholder | Filled with |
|---|---|
| The notification's title |
| The notification's message |
|
|
| The link to the record in ComplyTrain |
| The link's label, such as "View Details" |
| Your organisation's name |
| The recipient's email address |
| The link where the recipient manages their notification preferences |
To show text only when a value exists, wrap it: {{#if action_url}}Open it here: {{action_url}}{{/if}}. You can add {{else}} for text to show otherwise.
ComplyTrain wraps your body in its standard email layout. The layout adds your logo, primary colour and email footer from Branding, an action button and an unsubscribe link. See Set branding, date preferences and mobile access.
Product location: /settings/notifications/dashboard. Open Notifications, then Dashboard, in Settings, and select the Templates tab.
Your quality manager wants overdue recurring-task emails to be firmer and to name the organisation. The new email body is:
<p>{{message}}</p>
<p>Overdue tasks are reported in the monthly management review. Complete it today or ask your manager to reassign it.</p>
{{#if action_url}}<p><a href="{{action_url}}">{{action_label}}</a></p>{{/if}}
On Templates, choose Email under All Channels and select Edit on task_overdue.
Set Subject Template to Overdue at {{tenant_name}}: {{title}}.
Replace Body Template with the body above.
Select Show Preview and check the wording, then select Save Template.
On Notification Defaults, open Workflow and check that the task types have Email on with Immediate timing.
The next overdue task produces an email with the new wording, inside your branded layout. Check it in Deliveries under the Email channel.
