Find people in User Management, invite them with the right role and seat, and maintain their profile, sign-in access, roles and activity.
User Management is where you add people to your organisation and look after their accounts: invitations, profile details, sign-in access, passwords, the Admin role and the roles that decide what each person can do in the modules.
Product location: /settings/users. Open User Management in Settings, then All Users.
Two kinds of people can open User Management: organisation Admins, and people who hold a role with the Manage Users permission (users:manage). Everyone else does not see the page in the navigation.
Task | Admin | Manage Users permission |
|---|---|---|
See the user list, seat usage and pending users | Yes | Yes |
Invite a user or import users from a CSV file | Yes, with the Admin or User role | Yes, with the User role only |
Edit a profile, disable or enable an account, reset a password, change the account class | Any account | Accounts that are not Admins |
View a user's Activity Log | Yes | Yes |
Change the Admin/User role and assign platform roles | Yes | No |
Open Roles & Permissions and SSO Configuration | Yes | No |
A person with Manage Users can never change an Admin's account and can never make anyone an Admin. This stops a delegated user manager from locking out, or promoting themselves over, the administrators who gave them the permission. To delegate user management, create a role with Manage Users and assign it; see create roles and choose their permissions.
Product location: /settings/users. Open User Management in Settings, then All Users.
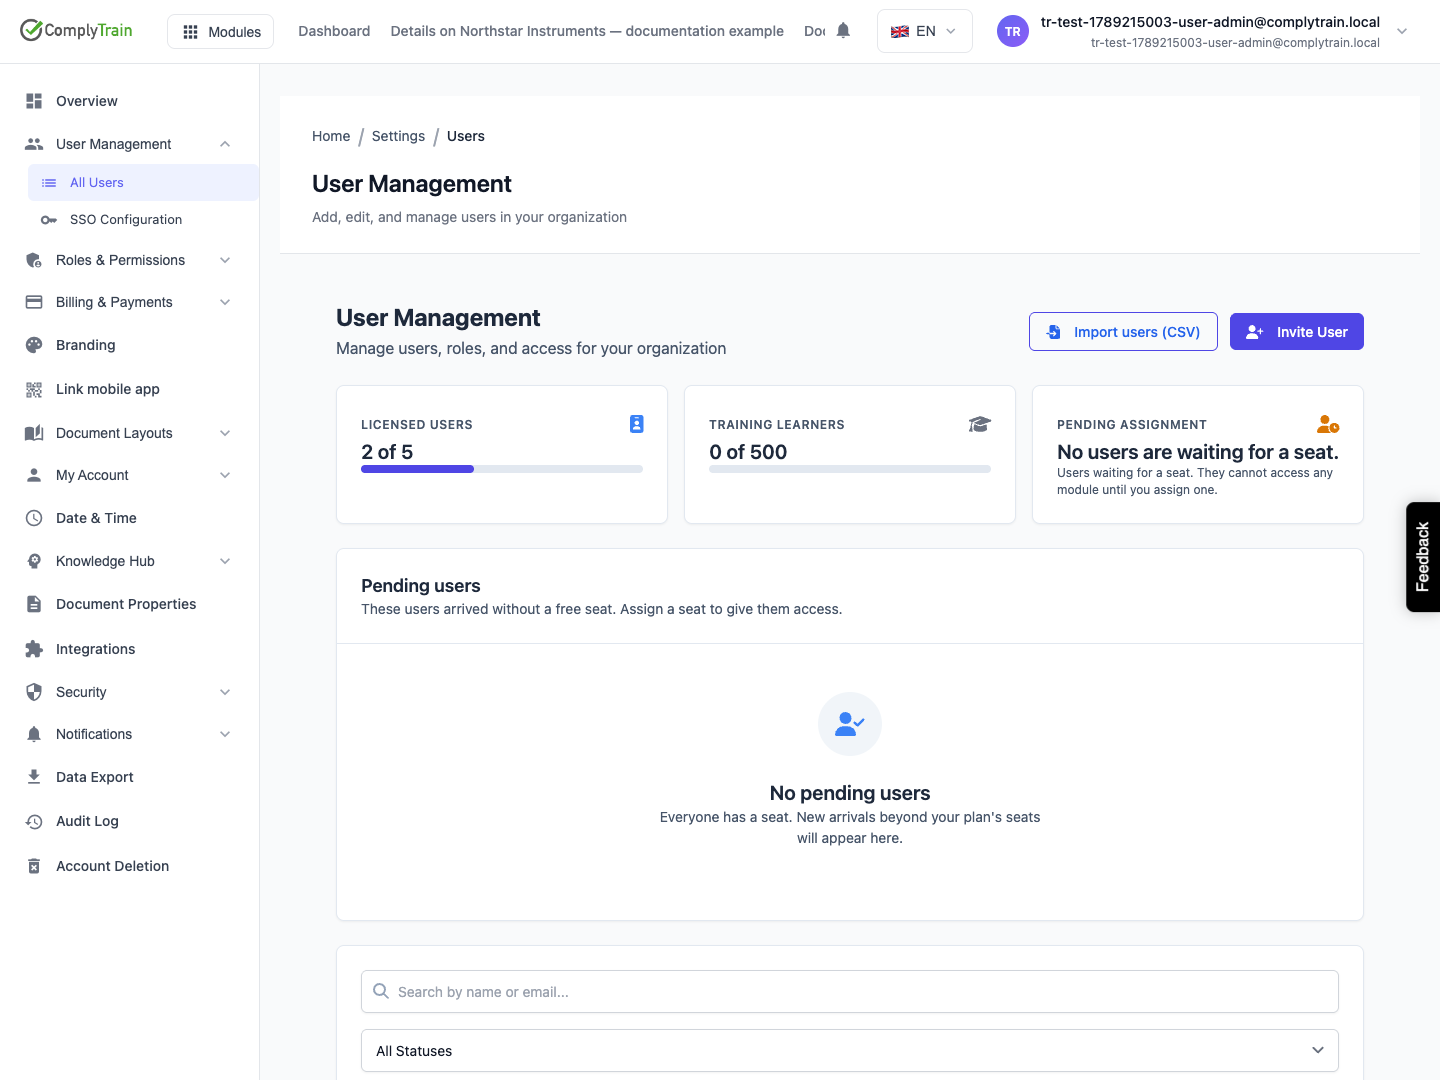
Open Settings, then User Management and All Users. The page is titled User Management.
The top of the page shows seat usage in three cards, Licensed users, Training learners and Pending assignment, followed by the Pending users list of people who are waiting for a seat. Both are explained in manage seats and account classes.
Below them are the header buttons Import users (CSV) and Invite User, the filters and the user table. While single sign-on is set to Force SSO Login, both buttons are unavailable and show the tooltip User management is disabled while Force SSO is active. People then get their accounts through your identity provider; see set up single sign-on.
Product location: /settings/users. Open User Management in Settings, then All Users.
Type in Search by name or email... to narrow the list to people whose first name, last name or email address contains the text. Combine the search with the filters:
Filter | Options |
|---|---|
Status | All Statuses, Active, Awaiting first sign-in, Unconfirmed |
Role | All Roles, Admin, User |
Account class | All classes, Licensed, Training learner, Pending |
Use the filter that shows All Users, Enabled or Disabled to list only people who can sign in, or only accounts whose sign-in is disabled.
The table shows 20 users at a time. Showing … of … users tells you how many are loaded; choose Load More to add the next set.
Column | What it shows |
|---|---|
User | Name, email address and job title. No name appears when no name has been entered. |
Role | Admin or User. |
Account class | Licensed, Training learner or Pending. |
Status | Active once the person has signed in and set a password; Awaiting first sign-in after an invitation; Unconfirmed when the account has not been confirmed; Disabled when sign-in is blocked. |
Last Login | Today, Yesterday, a number of days ago, a date, or Never. |
Actions | View details, Disable user or Enable user, Reset password and Change class…. |
Product location: /settings/users. Open User Management in Settings, then All Users.
Choose Invite User. The Invite User dialog opens.
Complete the fields below.
Choose Send Invitation. If the new licensed seat is charged, confirm the price first (see the next table).
Find the new person in the list. Their status is Awaiting first sign-in.
Field | What it does | Rules and defaults |
|---|---|---|
Email Address | The person's sign-in name and contact address. | Required and must be a valid address. It cannot be changed later. An address that already belongs to a user is refused, and the existing account is left unchanged. |
First Name, Last Name | The name shown throughout ComplyTrain and in the invitation email. | Optional. |
Role | User - Standard access or Admin - Full management access. | Default User. Only Admins see the Admin option. |
Account class | Licensed - Full access seat or Training learner - Training module only. | Default Licensed. When you choose Admin, the class is locked to Licensed: Administrators always use a licensed seat. |
Job Title, Department | Shown with the person's name in lists and on their profile. | Optional. |
Send invitation email | Sends an email with sign-in instructions and a temporary password. | On by default. |
The dialog tells you when a licensed seat goes beyond what your plan includes:
Your plan | What the dialog does |
|---|---|
Charges for extra users | Shows the price and the new monthly total, then asks Add a paid user for … per month?. Choose Send invitation to accept the charge. The rest of the current billing period is charged immediately and is not refunded if you remove the user later. |
Allows extra users at no charge | Explains that the extra user is free. No confirmation is needed. |
Does not allow extra users | Explains that all included licensed users are in use. Invite the person as a training learner, or upgrade the plan. |
If no seat of the chosen class is available, the dialog shows an alert with View plans and Dismiss and keeps your entries so you can change the class or upgrade. Seat rules and messages are described in manage seats and account classes.
Product location: /settings/users. Open User Management in Settings, then All Users.
The new account takes its seat straight away, so it appears in the seat counts before the person signs in. When Send invitation email is on, the person receives an email with a temporary password that is valid for seven days. What they see on first sign-in is described in first sign-in.
If you cleared Send invitation email, the account is created without an email. Send the invitation later with Reset password, which resends it to anyone who is still Awaiting first sign-in.
ComplyTrain also gives a new user their starting module roles, where the module is set up for your organisation:
Invited as | Starting roles |
|---|---|
Licensed User | Document Controller in Quality Management and Learner in Training |
Licensed Admin | Quality Manager in Quality Management, RMS Administrator in Risk Management and Training Administrator in Training |
Training learner | Learner in Training only |
Change these starting roles on the person's Role & Permissions tab, in user groups or in each module's own role settings. The invitation is recorded in the audit trail, and you receive a notification that the user was invited.
To add many people at once, use import users from a CSV file.
Product location: /settings/users/{userId} (fallback: /settings/users). Choose View details on the user's row.
Choose View details on a row, or the person's entry on a role or group page. The header shows the name, email address, Admin or User, and the status. Back to Users returns to the list.
The header buttons are Edit, Disable or Enable, and Reset password. They are hidden when a Manage Users holder opens an Admin's account.
The page has three tabs: Profile, Role & Permissions (Admins only) and Activity Log.
Product location: /settings/users/{userId} (fallback: /settings/users). Open the user and choose Edit on the Profile tab.
On the Profile tab, choose Edit.
Change the fields you need.
Choose Save Changes. Profile Updated confirms the save. Cancel discards your edits.
Field | Notes |
|---|---|
Email Address | Read-only: Email cannot be changed. |
User ID | Read-only identifier of the account. |
First Name, Last Name | Shown wherever the person appears, for example in assignments, approvals and lists. |
Phone Number, Job Title, Department | Contact and organisational details. Job title appears under the name in the user list. |
Timezone | One of ten time zones, from Eastern Time (ET) to Sydney (AEST). It is the person's own time-zone preference, which they can also change in My Profile, and dates and times are shown to them in it. |
Language | English (US), English (UK), German, French, Spanish, Japanese or Chinese (Simplified). |
Account Information shows when the account was Created and Last Modified, the Last Login and the Login Count. People can also update their own details; see update your profile and password.
Product location: /settings/users. Open User Management in Settings, then All Users.
Disabling stops a person from signing in without deleting anything. Their records, account class, roles and group memberships stay in place, so enabling the account restores the same access.
Choose Disable user in the list, or Disable on the user's page.
Read Disable User?: "This will prevent … from logging in."
Choose Yes, disable user. The status changes to Disabled.
To restore access, choose Enable user or Enable, then Yes, enable user in Enable User?. You cannot disable your own account; ask another administrator.
Product location: /settings/users. Open User Management in Settings, then All Users.
Choose Reset password in the list or on the user's page.
Confirm Reset Password? with Yes, reset password.
Password Reset Sent confirms that an email is on its way.
For a person who is still Awaiting first sign-in, the reset sends the invitation again with a new temporary password. For everyone else it sends a password-reset email; the person follows it to choose a new password, which must meet your password policy. Resetting does not change the person's roles, class or data.
Product location: /settings/users/{userId} (fallback: /settings/users). Open the user and choose the Role & Permissions tab.
Only Admins see the Role & Permissions tab. Under Role Assignment, choose Admin or User:
Admin: full access to all features, including user management, settings and system configuration. Admins pass every permission check in every module, whatever roles they hold.
User: access to what their roles, account class and module settings allow.
Selecting the other option asks Change Role? Choose Yes, change role; Role Updated confirms it. The person gets or loses Admin access the next time they sign in. You cannot remove your own Admin role; another Admin must do it. An Admin needs a licensed seat, so change a training learner's class to Licensed before making them an Admin.
Product location: /settings/users/{userId} (fallback: /settings/users). Open the user and choose the Role & Permissions tab.
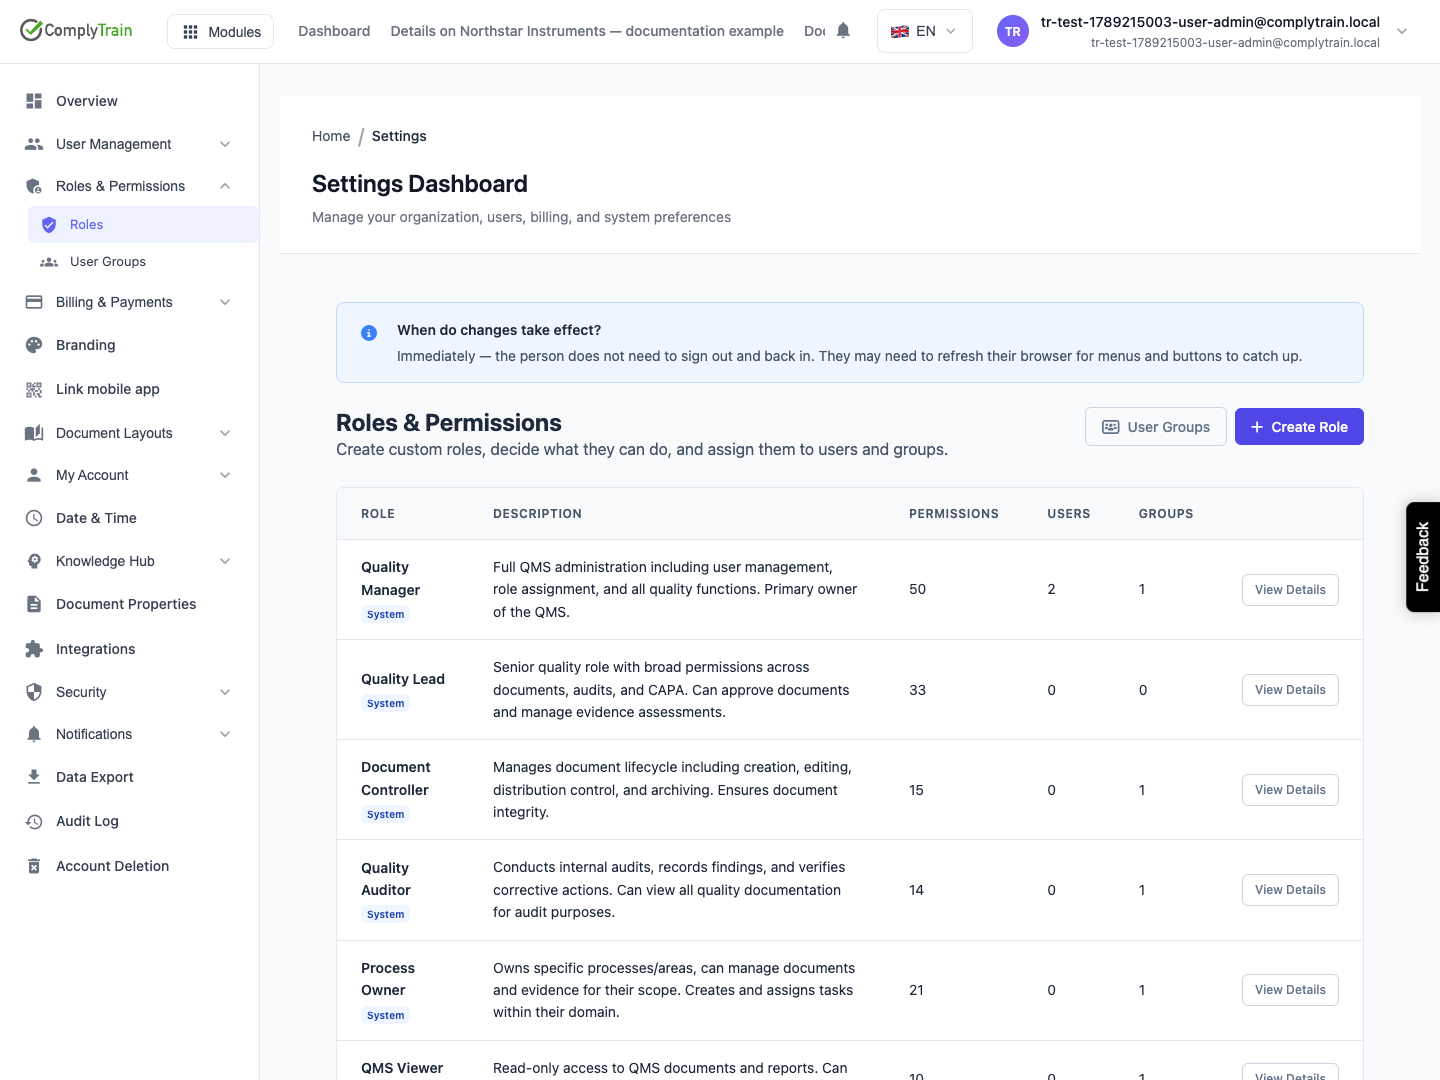
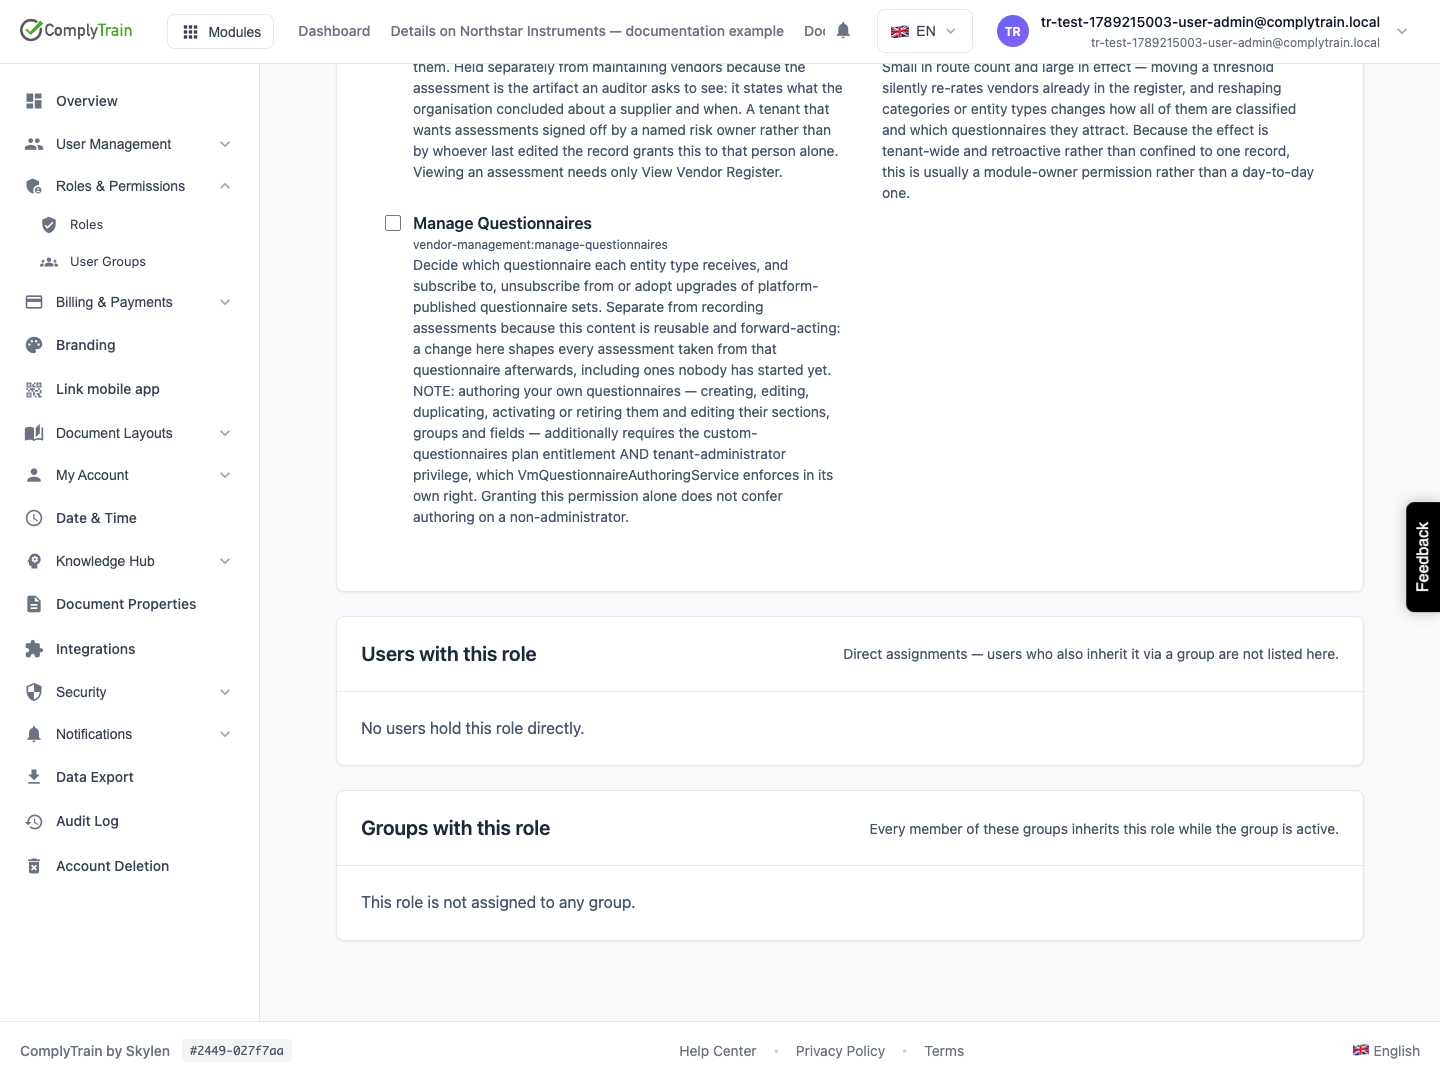
Platform Roles, on the same tab, lists every active role in your organisation, with a System badge on roles that ComplyTrain provides.
Tick the roles the person should hold directly, and clear the ones they should lose.
Choose Save Changes. Roles updated confirms it. Cancel restores the saved selection.
The change takes effect within seconds, without signing out; the person may need to refresh their browser for menus and buttons to catch up. These are the same direct role assignments that Quality Management shows under Users & Roles; see QMS user roles.
Inherited from groups lists roles the person receives through a group, as "… via group …". You change those on the group, not here. Clearing a direct role does not remove the same role when it also comes through a group. Manage roles and permissions opens the role list. See create roles and choose their permissions and grant roles through user groups.
Product location: /settings/users/{userId} (fallback: /settings/users). Open the user and choose the Activity Log tab.
The Activity Log tab lists the requests the person has made in ComplyTrain, newest first, 20 per page. Use Previous and Next to move through all entries; Page … of … shows where you are.
Column | What it shows |
|---|---|
Action | What the person did. |
Endpoint | The type and address of the request. |
Status | The result code: 200 to 299 succeeded, 400 to 499 were refused or invalid, 500 and above failed. |
IP Address | Where the request came from. |
Date | When it happened. |
No activity recorded appears for someone who has not used ComplyTrain yet. For every request across the organisation, and to export them, use API activity. To find who changed a user's access or roles, use the audit trail.
