Choose destinations, map answers, configure follow-up and approval, and check the results of all ten QMS form output action types.
An output action describes work to perform after a matching form submission. Choose the action for the result you need, configure its destination and answer mappings, then check the saved result with a controlled response.
Product location: /qms/output-rules/{documentTemplateId}/rules/{ruleId}/actions/new (fallback: /qms/output-rules). Select an action type and review Sort Order and Active.
Open Data Collection → Output Rules, select the form, expand its rule and choose Add Action. The create location is /qms/output-rules/{documentTemplateId}/rules/{ruleId}/actions/new. Use an existing action's edit icon to open /qms/output-rules/{documentTemplateId}/rules/{ruleId}/actions/{actionId}. You need QMS Manage forms.
Choose an action type, set its Sort Order and review Active. Order starts at 0; lower values execute first within the rule. New actions start active. Keep a new example inactive while preparing its settings; activate it when ready for a controlled submission. Its parent rule must also be active and match the submitted answers before the action can run.
Changing type changes the settings needed for that action. Review the destination, mappings and order again after selecting a different type.
Use Create or Update to save configuration, or Cancel to leave without saving. Reopen the form's rule list and inspect the saved action. See rule configuration.
A field mapping uses the form's saved field code, such as owner_user_id; an identifier setting uses the actual target object's identifier. For text templates, wrap the field code in braces: Inspection follow-up: {equipment_name} inserts that answer. The shared text-template substitutions include {submission_id}, {date}, {timestamp}, {year}, {month} and {day}. Date substitutions describe the time the action runs; use a form date field when the event date must come from the response. Test the resulting text with populated answers before routine use.
Product location: /qms/output-rules/{documentTemplateId}/rules/{ruleId}/actions/new (fallback: /qms/output-rules). Select Generate Record and inspect its Configuration panel.
Use this type when a completed form should produce a quality record. Prepare a record template with the structure and review workflow the resulting record needs.
Control | Default and purpose |
|---|---|
Record Template | Initially unselected. Choose the QMS record template for the resulting record. |
Naming Template | Initially blank. Enter a name pattern using answer placeholders, for example |
Folder Path | Initially blank. Set the intended destination folder where the record's filing configuration uses a folder. |
Include Attachments | Selected. Include the submitted attachments in the generated output. |
Include Signatures | Selected. Include any signature answers stored with the response. |
Choose the intended record template. Check its standard, contents and workflow before using it as an automatic destination.
Enter a meaningful name pattern. Include an identifying answer or the submission identifier so reviewers can distinguish repeated submissions.
Set the folder and inclusion choices. When the form's Record must be signed setting is selected, the record is signed after it is created, through its own approval steps. For a record filed in a document vault, the action checks that the workflow of the record's document type includes a transition that asks for a signature; if it does not, the action fails and names what is missing. Such a record is never approved automatically.
Save and reopen the action. Activate the completed rule and action, then submit a controlled response with representative answers and attachments.
Open the resulting record. Check its number, template, name, folder, answers and source-submission reference. Inspect the included files. Where the form requires the record to be signed, continue with the signing through the record's workflow.
When no explicit record template is selected, generation can use a record template linked to the form, or the standard's document vault where configured. Check the destination deliberately rather than leaving the outcome to an unfamiliar default. If the template list is empty, prepare the appropriate record template first.
Continue the resulting record's normal review and approval workflow. Generating a record records the response; it does not make a human approval decision.
Product location: /qms/output-rules/{documentTemplateId}/rules/{ruleId}/actions/new (fallback: /qms/output-rules). Select Create CAPA and inspect its Configuration panel.
Use this type when a response should initiate corrective or preventive follow-up. A failed inspection might create a corrective action; a response identifying a potential future problem might create a preventive action.
Control | Default and purpose |
|---|---|
CAPA Type | Corrective. The other choices are Preventive, Corrective and preventive, and From Form Field. With From Form Field, choose the question in Form field carrying the CAPA type; its answer must be |
Due Date Offset (Days) | 30. Days from the submission date to the CAPA's target close date. 0 means the submission day itself. |
CAPA title | Blank. A title pattern with answer placeholders, for example |
Auto-map form fields to CAPA | Selected. Fill the CAPA's description, owner and severity from questions with conventional field codes. |
For From Form Field, choose the question that supplies the type and make its stored values corrective, preventive or both. Use a fixed type when every matching response has the same purpose. Set a realistic target date for the follow-up; an offset of 0 means the submission date.
Automatic mapping uses each question's field code, not its label or standard type. For each CAPA property it uses the first of these codes that has an answer:
CAPA information | Field codes checked, in order |
|---|---|
Description |
|
Owner |
|
Owner email |
|
Severity |
|
An owner answer that is a user identifier assigns that user; other text is recorded as the owner's name. A severity answer must be an active CAPA severity code or a severity identifier; a code that is not active fails the action. Record the incident date, root-cause category and containment action on the CAPA during its investigation.
Use answers that identify the intended severity and person in the configured quality system.
Save and reopen the action, then test a matching response. Inspect the created CAPA's number, title, type, description, owner, severity and target date. Compare mapped information with the response and retain the source-submission reference. Continue the CAPA lifecycle for investigation, actions, verification and closure.
Product location: /qms/output-rules/{documentTemplateId}/rules/{ruleId}/actions/new (fallback: /qms/output-rules). Select Create Task and inspect its Configuration panel.
Use this type to assign follow-up work after a form is submitted. Make the title identify the work and use the description to explain the expected result.
Control | Default and purpose |
|---|---|
Task Name | Blank. Enter the task title, optionally with answer placeholders. |
Task Description | Blank. Enter instructions and the information needed to complete the task. |
Assignee Type | Role. Alternatives are User and From Form Field. |
Role, User or Form field carrying the assignee's user id | Required. The list matches the Assignee Type: a QMS role, an active user, or the question whose answer is the assignee's user identifier. |
Priority | Medium. Alternatives are Low and High. |
Due Date (Days from Submission) | 7. Number of days from submission to the task's due date. Zero means the submission date. |
Choose User for a named person, Role for work assigned by responsibility, or From Form Field when the response supplies the responsible user. For From Form Field, choose the question, such as owner_user_id, whose answer is the identifier of an active user; an empty or any other answer fails the action.
For example, Review inspection for {equipment_name} gives the assignee useful context. A description can include {inspection_result} and explain which evidence to review before completing the task. Use the actual codes in your form.
After saving and reopening the action, submit a controlled matching response. Open the resulting task and check its title, description, assignment, priority, due date and source response. If approval delays creation, the due-date basis remains the submission date; choose the offset with that review time in mind. Task creation assigns work; the assignee still needs to carry it through to completion.
Product location: /qms/output-rules/{documentTemplateId}/rules/{ruleId}/actions/new (fallback: /qms/output-rules). Select Send Notification and inspect its Configuration panel.
Use this type when a matching submission should notify selected recipients. Put the reason for the notification in the subject and the requested response in the body.
Control | Default and purpose |
|---|---|
Recipient Type | Role. Other choices are User, Group and From Form Field. |
Role, User, Group or Form field carrying the recipient's user id | Required. The list matches the Recipient Type. For a form field, its answer holds one or more active users' identifiers, separated by commas. |
Priority | Normal. Other choices are Low, High and Urgent. |
Subject | Blank. Enter the notification heading, optionally using answer placeholders. |
Body | Blank. Enter the notification message and any requested follow-up. |
Use User for a specific recipient, Group or Role for a configured set of recipients, and From Form Field when the response identifies the recipients. Choose the question and check that its answer contains the intended users' identifiers.
For example, the subject Inspection result: {equipment_name} and a body referring to {inspection_result} can make the notification meaningful without copying every answer. Choose a priority appropriate to the required response and check the recipients' notification preferences.
Save and reopen the action. Use a controlled submission addressed to test recipients, then check the received subject, body and priority. Verify each intended recipient, including the members selected through a role or group. The action's result shows how many active users each recipient source resolved to; if no recipient resolves, the action fails. A saved action is configuration; notification delivery follows a matching submission.
Product location: /qms/output-rules/{documentTemplateId}/rules/{ruleId}/actions/new (fallback: /qms/output-rules). Select Webhook and inspect its Configuration panel.
Use this type to deliver a form submission to an external HTTP endpoint. Agree the destination and payload handling with the receiving system's owner before activating the action.
Control | Default and purpose |
|---|---|
Webhook URL | Required. Enter the complete receiving endpoint URL. Use HTTPS for a protected connection. |
HTTP Method | POST. Choose PUT when required by the receiving service. |
Retry Count | 3 retries. Alternatives are No Retries, 1 retry and 5 retries. A retry is an attempt after the first request. |
With No Retries, the action makes one attempt. 1 retry permits up to two attempts, 3 retries up to four and 5 retries up to six. A successful response ends delivery attempts. The receiving system should use the submission identifier to handle repeated delivery safely, so a retry does not create a second business record.
The default JSON payload identifies the tenant, submission, submitting user and timestamp. Its formValues contains entries keyed by field code, each with the field name, type and submitted value. Agree which information the receiver will use, including its treatment of empty answers and structured values.
Prepare a test endpoint that accepts the selected method and JSON payload.
Set the Webhook URL, method and retry count, then save and reopen the action.
Activate the completed rule and action and send a controlled matching response.
Confirm the receiving service accepted the request and inspect the resulting external record. Compare its submission identifier and answers with the source response.
Exercise an unsuccessful response and the selected retry behavior in the test destination before routine use.
An HTTP success confirms the request was accepted by the endpoint; check the receiver's business result as well. A timeout can occur after the receiver accepted work, which is why repeated-delivery handling matters.
Product location: /qms/output-rules/{documentTemplateId}/rules/{ruleId}/actions/new (fallback: /qms/output-rules). Select Link Evidence and inspect its Configuration panel.
Use this action when the submitted response is evidence that needs to be retained against a specific target. CAPA is the primary destination. Choose a standard requirement when the response itself demonstrates something the requirement asks for, rather than creating a document or process solely to hold that evidence.
Destination | Use it for | Check before activation |
|---|---|---|
CAPA | Inspection results, follow-up checks or other submitted answers supporting an existing corrective or preventive action. | The intended CAPA or the form field that supplies its identifier, and the evidence category. |
Standard requirement | Direct evidence of how a requirement is met, such as a completed check that records actual conditions or results. | The standard and requirement, the evidence's purpose, and whether an assessment should be requested. |
Add Link Evidence to the rule. Under Where to file the evidence, keep CAPA (primary) selected.
Under Target, choose A specific target, chosen here and select the CAPA, or choose Taken from a form field and select the field that supplies its identifier. A fixed target suits a form dedicated to one CAPA; a field suits a reusable follow-up form.
For a field mapping, select the field in Form field carrying the CAPA id; the list shows each field's name and code. Confirm that the submitted answer contains the intended CAPA identifier, rather than its title or number.
Choose the Evidence category that describes the evidence: Containment, Root cause analysis, Implementation, Verification or Effectiveness. Implementation is preselected.
Save the action and reopen it to confirm the destination and target settings. Keep it inactive while preparing the rule.
When the rule and action are ready, activate both and submit a controlled matching response. Open the target CAPA and inspect its evidence. Check the retained answers and reference back to the originating submission.
For example, a follow-up inspection form can retain the observed result as evidence for the CAPA that prompted the inspection. Continue the CAPA's normal investigation, verification and closure workflow; the existence of an evidence item does not complete those decisions.
Under Where to file the evidence, choose Standard requirement.
Under Target, select the Standard and then the Requirement, or choose Taken from a form field and select Form field carrying the requirement id. A field-supplied requirement must be an in-scope requirement of the form's own standard. Check the standard as well as the clause; the same clause number can occur in different standards.
Choose Link Type according to what the submitted response demonstrates.
Set Trigger Evidence Assessment when the new link should be assessed against the requirement.
Save and reopen the action. When its rule and settings are ready, activate the rule and action, then test a matching response. Open the requirement's evidence and confirm the source submission, standard, clause and link purpose. Review any requested assessment separately.
Link Type | Purpose |
|---|---|
Primary Evidence | The response is the main evidence addressing the requirement. |
Supporting Evidence | The response strengthens other evidence for the requirement. |
Reference | The response supplies relevant context. Its presence alone does not demonstrate fulfilment. |
A submitted check can provide evidence of what was done or observed without needing a new policy document or process definition. Explain why it addresses the requirement and review the actual answers. Linking the response, requesting an assessment and accepting the evidence are distinct steps. An AI assessment is not human approval or an inspection outcome; follow requirement evidence review.
Check the output result and the target's evidence record, including the source-submission reference. If the rule uses a field to choose its target, test responses for different targets so that evidence reaches the correct CAPA or requirement. Also test a non-matching response and an inactive action. A successful action save records configuration; the saved evidence is the result to verify.
Product location: /qms/output-rules/{documentTemplateId}/rules/{ruleId}/actions/new (fallback: /qms/output-rules). Select Require Approval and inspect its Configuration panel.
Use this action when named people must approve or reject a submitted response before the outputs that depend on it run. The approval belongs to that submission: each approver receives an inbox task, and the decision is recorded on the response.
Choose at least one source of approvers. Until you do, the editor shows Choose at least one approver: users, roles or a form field. and the action cannot be saved. You can combine sources: each user, whether selected here or named by the form field, and each selected role becomes one approver.
Control | Default and purpose |
|---|---|
Approvers (users) | None. Select one or more active users in your organisation. Hold Ctrl (Windows) or Cmd (Mac) to select several. |
Approvers (roles) | None. Select QMS roles. Any holder of a selected role can decide on that role's behalf. |
Approver from a form field | None. Select a form field whose submitted value is the user ID of an active user. Several IDs can be separated by commas. If an answer is not the ID of an active user, the approval is not opened and the action fails. |
Decision rule | Any one approver decides: the first decision closes the approval. All approvers must approve: every approver must approve, and a single rejection closes it as rejected. |
Due in (days) | Empty. Sets the due date of the approval tasks, counted from when the approval is requested. Leave it empty for no due date. A due date does not make a decision automatically. |
A comment is required with the decision | Cleared. When selected, an approver cannot approve or reject without a comment. |
An electronic signature is required | Cleared. When selected, the approver must sign the decision explicitly. Their name, email address, network address and the time are recorded with it. |
Hold the later actions of this rule until the decision | Selected. The actions after this one in the same rule wait while the decision is pending. Actions before it, and every other matching rule, run normally. When cleared, the decision is recorded but nothing waits for it. |
When rejected | Cancel the waiting actions (default) or Run the waiting actions anyway. The rejection is recorded on the submission either way. |
Place the approval before the outputs that depend on it, in the same rule, and keep Hold the later actions of this rule until the decision selected. For example, rule A can require approval before generating a supplier record, while rule B sends a receipt notification for the same submission. The record in rule A waits for the decision; the notification in rule B is sent straight away.
Use a role when the decision belongs to a function rather than a person, for example the holder of a Supplier quality role. Use a form field when the respondent chooses who reviews their request, such as the line manager of a change request. Check that the field offers only real, active users.
Each approver receives a task named Approval required: followed by the form name. Opening the task shows Approval of a form submission: the Submitted form, who submitted it and when, the Rule, the due date, the approvers with their decisions, and Actions waiting for this decision.
The approver reviews the submitted response, enters a Comment where needed and, when a signature is required, selects I sign this decision electronically. They then choose Approve or Reject; both stay unavailable until a required comment and signature are supplied. Only the named approvers, or holders of a named role, can decide, and each approver decides once.
When All approvers must approve is selected, an approver who has approved sees You have decided; the approval waits for the other approvers. Once the approval closes, the panel shows Approved or Rejected, who decided and when with their comment, and the state of each waiting action, such as Done, Failed or Cancelled. The approver whose decision closes it also sees a summary of how many waiting actions ran, succeeded or failed and how many were cancelled. Each approver's task is completed when they decide; when the approval closes, the tasks of approvers who have not decided are dismissed.
After submission, the confirmation lists the approval as Awaiting approval and each held action as Waits for the approval decision. These are waiting states, not failures. The response is Under review while the decision is pending, then Approved or Rejected, with the reviewer, time and comment.
Save and reopen the action, then test it with controlled responses:
Submit a response that matches two rules: one with the approval followed by a dependent output, and one without approval. Check that the second rule's output runs while the dependent output waits.
Open the approver's task and approve. Check that the waiting output runs once, the response shows Approved and the decision appears on the response.
Submit another response and reject it. Check the configured behaviour: with Cancel the waiting actions, the waiting output is cancelled; with Run the waiting actions anyway, it runs. The response shows Rejected in both cases. Running the actions does not turn a rejection into an approval.
If you use All approvers must approve, a comment or a signature, test those requirements with a second approver before routine use.
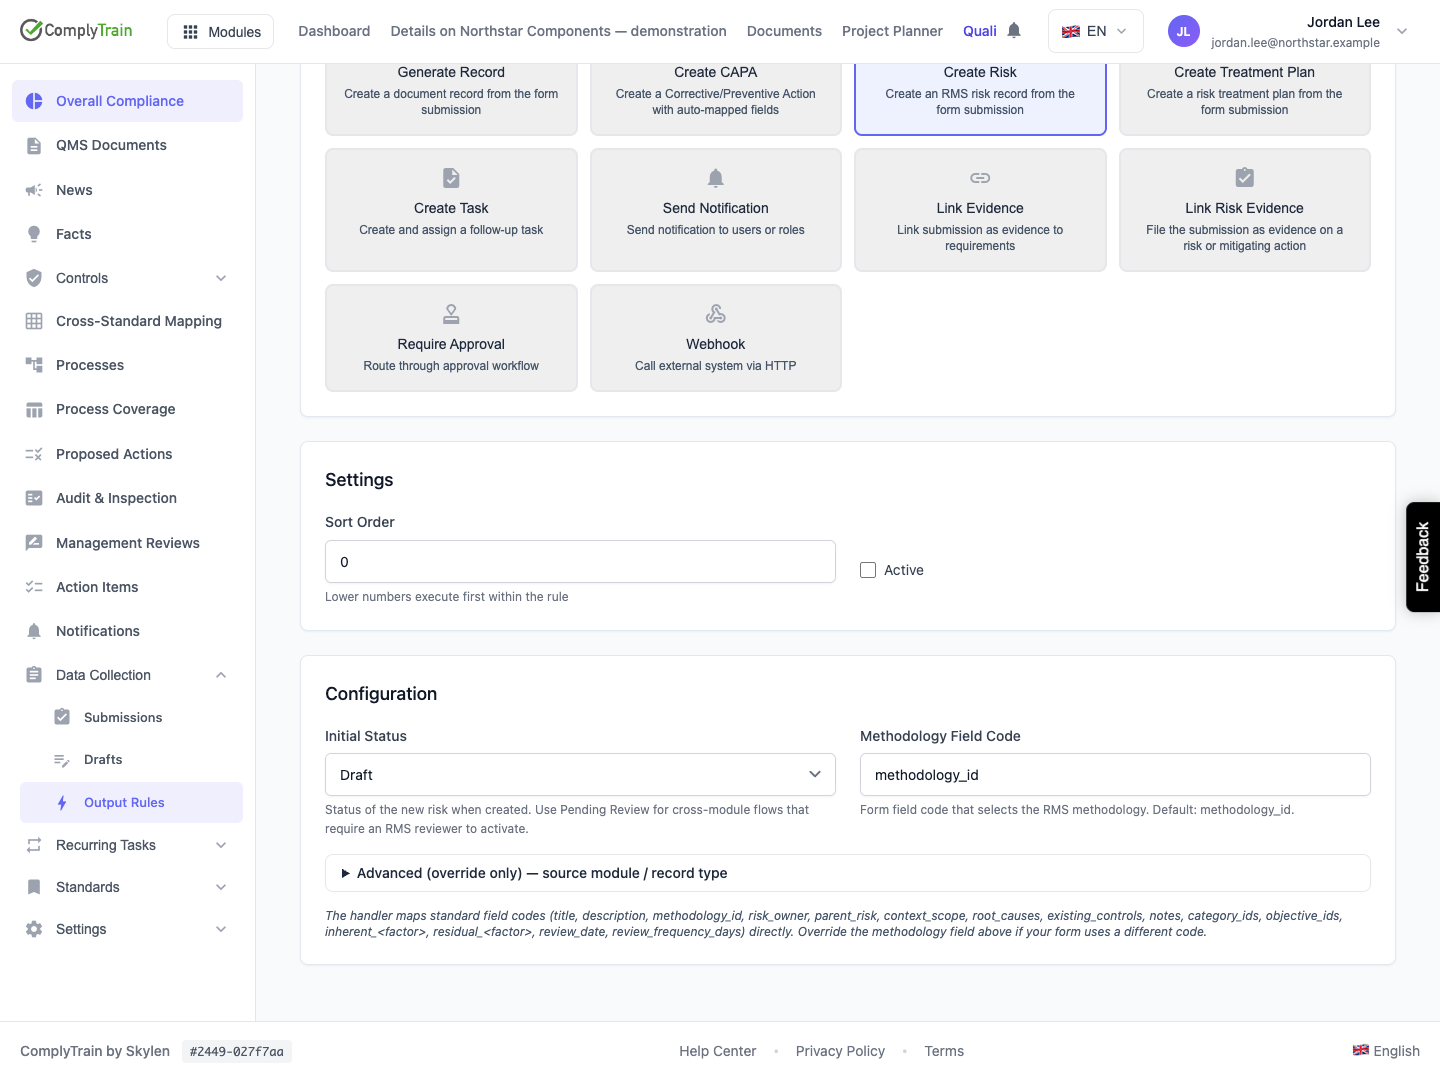
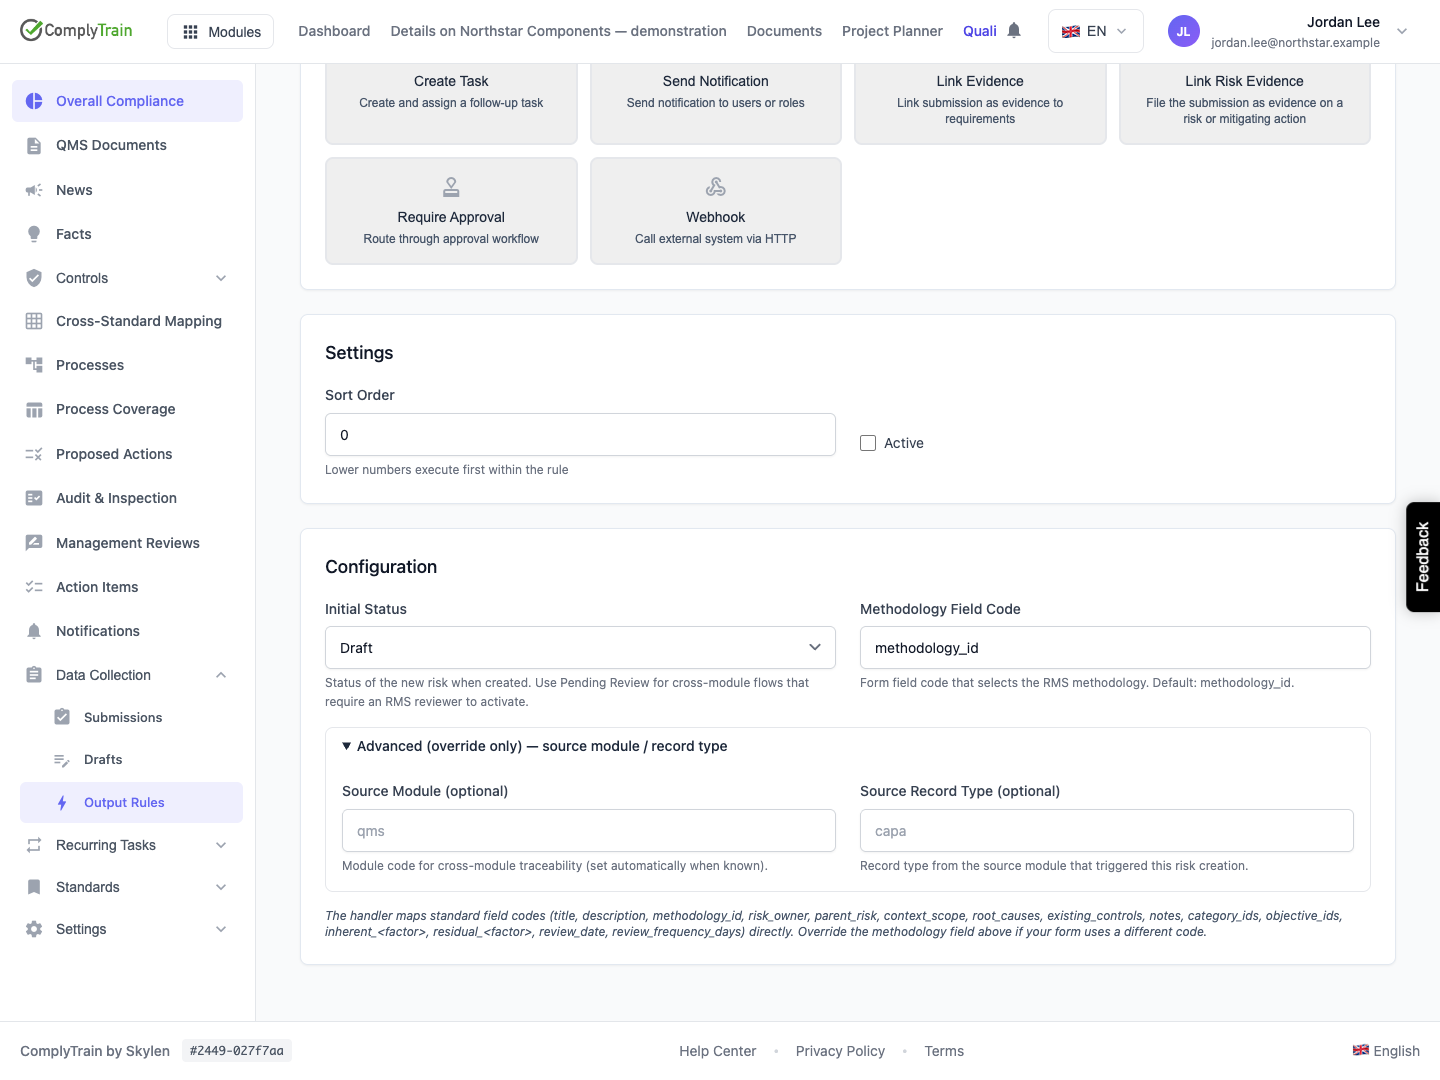
Product location: /qms/output-rules/{documentTemplateId}/rules/{ruleId}/actions/new (fallback: /qms/output-rules). Select Create Risk and inspect its Configuration panel.
Use this type to create an RMS risk from a QMS form. The target module must be available and the submitting user's RMS authority must satisfy Create risks. QMS Manage forms alone does not confer that permission.
Control | Default and meaning |
|---|---|
Initial Status | Draft. Active and Pending Review are alternatives. Select the state appropriate for the receiving RMS process. |
Methodology Field Code |
|
Source Module | Under Advanced (override only). Blank. Optional source-module code for traceability. |
Source Record Type | Under Advanced (override only). Blank. Optional classification of the source record. Source tracking is added when Source Module is supplied; the source record identifier is the submission ID. |
These visible settings use the names recognized by the risk handler. The rest of the mapping follows the form's field codes:
Form fields | Expected answers |
|---|---|
| Text describing the risk. A missing title falls back to Untitled Risk. |
| User and parent-risk identifiers, where applicable. |
| Arrays of identifiers, with comma-separated text also accepted by the mapping. |
| Numeric factor scores for the chosen methodology. The factor must resolve to that methodology's factor identifier. |
| A date answer and numeric review interval. |
The existing_controls text answer is retained on the submission but is not copied into the risk's linked controls. Use the RMS controls workflow to establish those links and their effectiveness. Check the created risk's methodology, status, owner, factors and source reference; a matching field name alone does not prove that the answer contains a valid identifier or score.
Product location: /qms/output-rules/{documentTemplateId}/rules/{ruleId}/actions/new (fallback: /qms/output-rules). Select Create Treatment Plan and inspect its Configuration panel.
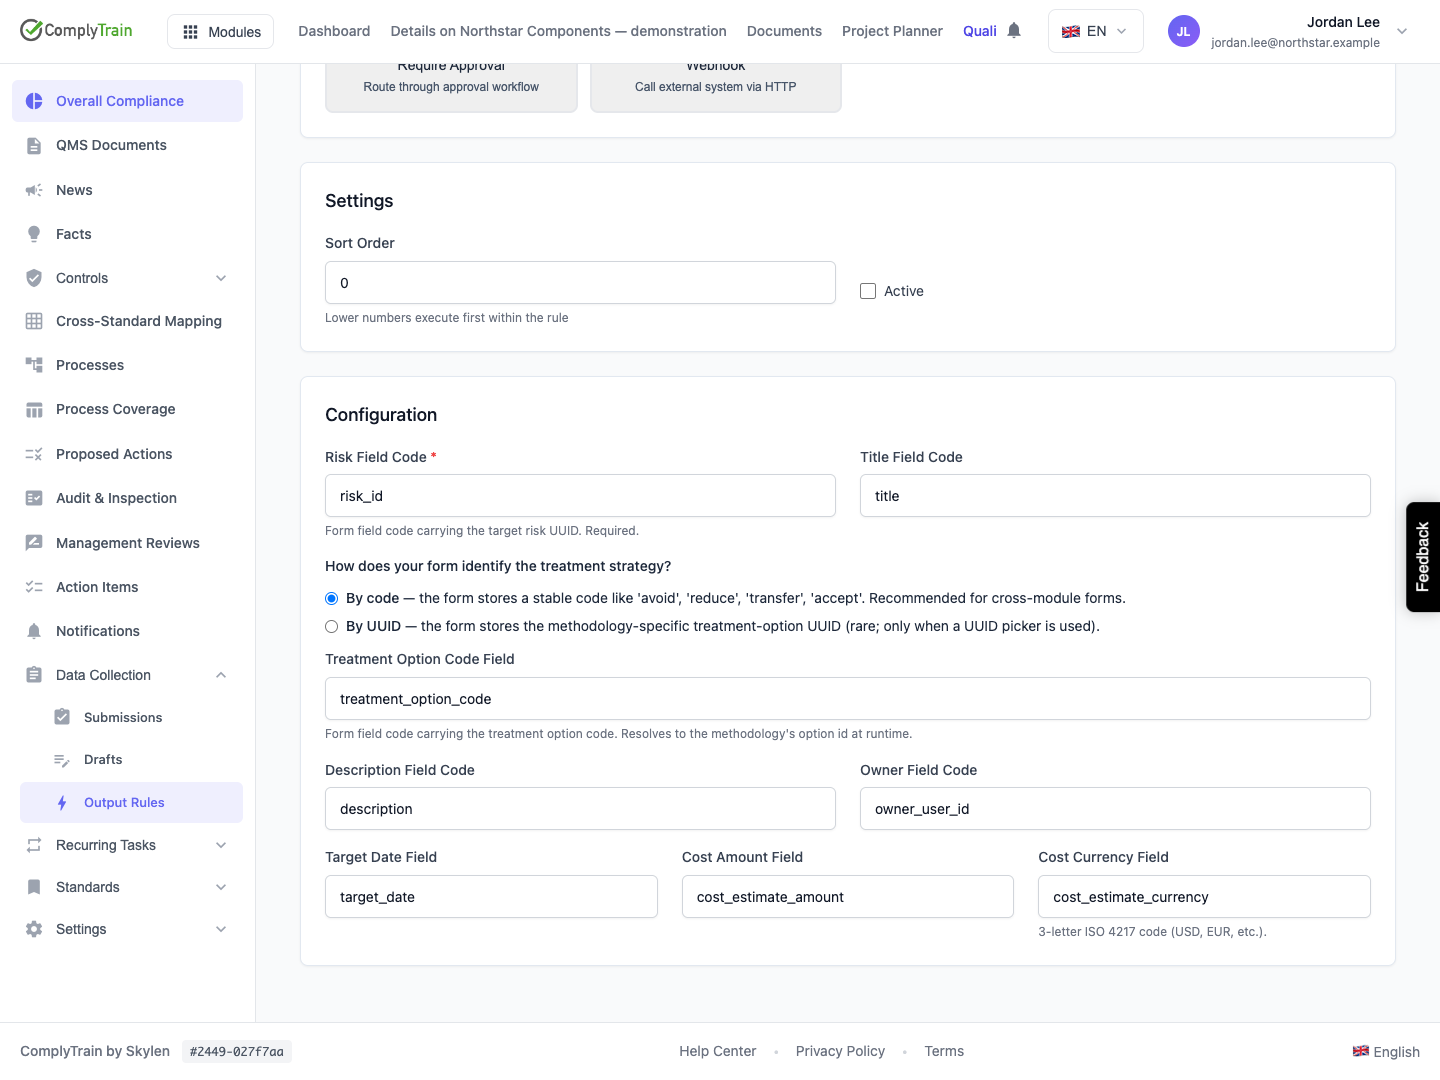
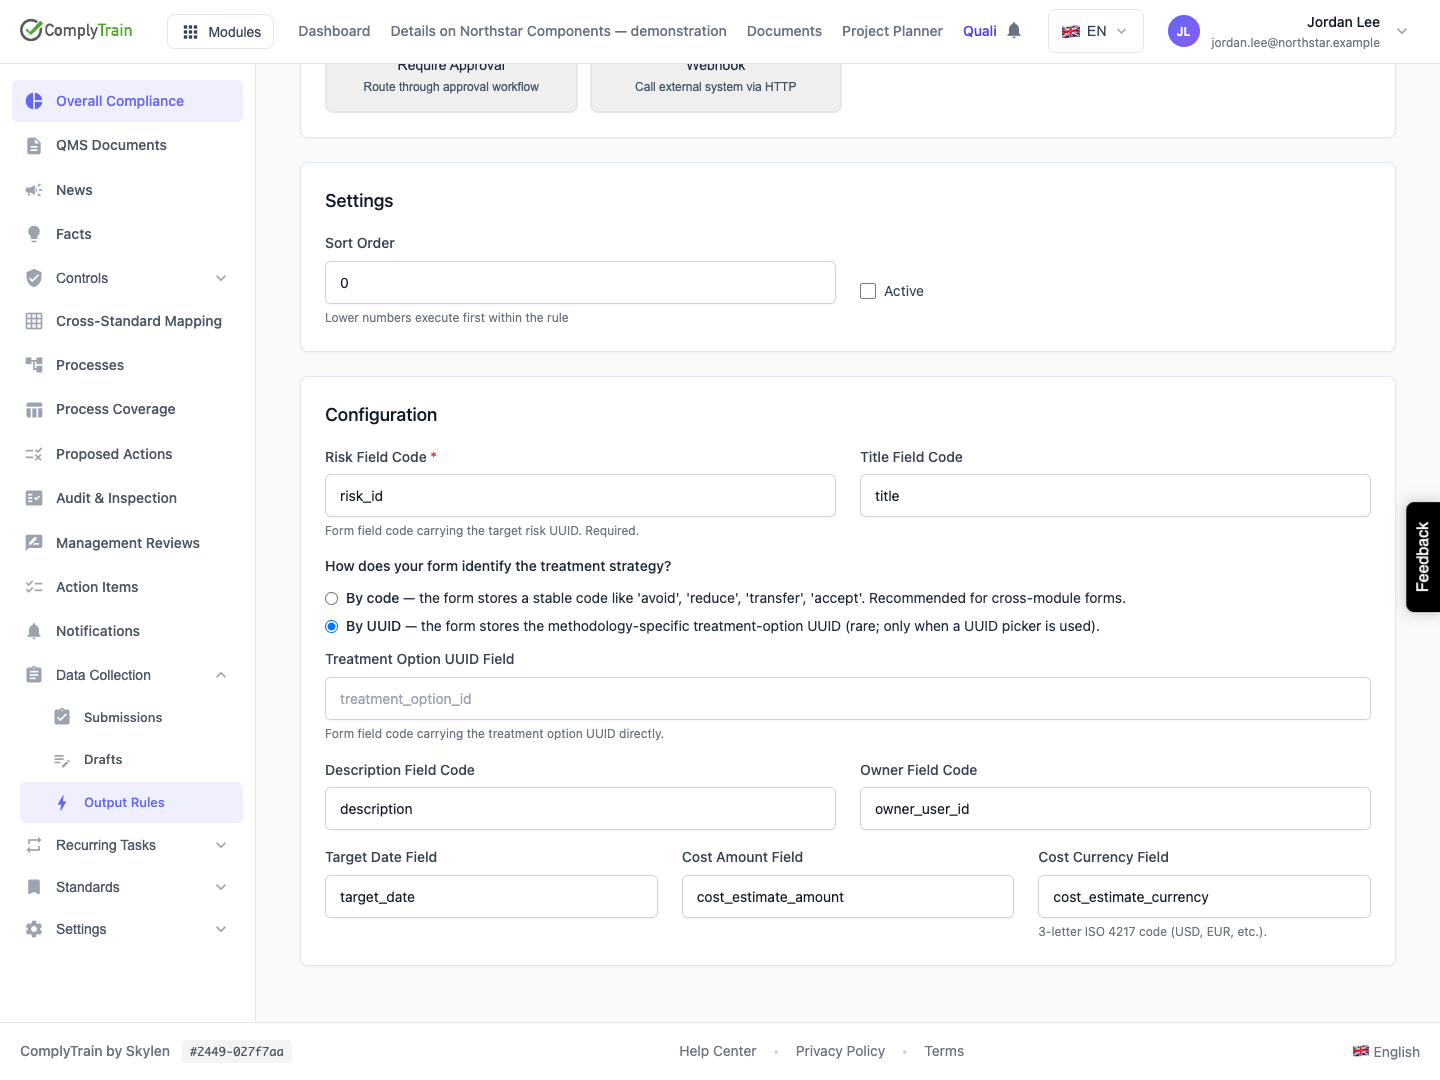
Use this type to create an RMS treatment plan for an existing risk. It requires RMS Manage actions for the submitting user. Action order alone does not automatically put the identifier returned by an earlier Create Risk action into this form's risk field.
Control | Default and meaning |
|---|---|
Risk Field Code |
|
Title Field Code |
|
Treatment option mode | Code mode initially. Choose code mode for an answer such as |
Treatment Option Code Field |
|
Treatment Option UUID Field | Initially blank. Visible in ID mode. Enter the code of the form field carrying the option UUID. |
Description Field Code |
|
Owner Field Code |
|
Target Date Field |
|
Cost Amount Field |
|
Cost Currency Field |
|
The editor saves the selected option mapping and omits the other mode's mapping. The handler also has default option field names, so avoid populating conflicting code and ID answers. An absent target risk or an absent treatment option causes the action to fail. An input containing a field label instead of its saved code does not retrieve that answer.
Read the action's result in the response's Output Rule Executions; it identifies the created plan and its risk. Open the risk's Treatment tab to check the plan and continue its lifecycle: approve, start, complete or cancel it. Test a response for a missing risk and a missing treatment option as well. Plan creation does not complete its treatment work or demonstrate reduced risk.
Product location: /qms/output-rules/{documentTemplateId}/rules/{ruleId}/actions/new (fallback: /qms/output-rules). Select Link Risk Evidence and inspect its Configuration panel.
Use this type to retain submitted answers as text evidence for an existing RMS risk, optionally against one of that risk's mitigating actions. For example, an inspection response can record the observed result of a mitigation. The submitting user needs RMS Edit risks.
Setting | What to configure |
|---|---|
Risk target | A specific target, chosen here picks a risk from the register. Taken from a form field uses the question whose answer is the risk's identifier; Fallback risk (optional) is used when that answer is empty. The risk must not be obsolete. |
Mitigating action | File on the risk itself (default), A specific action of the chosen risk (offered when the risk is chosen here), or Taken from a form field. The action must belong to the target risk. |
Evidence type | Incident report, Root cause analysis, Photo, Policy, Test report, Implementation evidence, Correspondence or Other. The default is Other. |
Evidence title | Enter a descriptive title, optionally using answer placeholders and the submission identifier. |
Identify the target risk and, where relevant, the mitigating action whose result the form records.
Choose the risk here, or choose Taken from a form field and select the question, such as risk_id, whose answer supplies the risk identifier.
Set the evidence type and a meaningful title, such as Inspection evidence: {equipment_name}-{submission_id}.
Save and reopen the action. Activate it with its completed rule, then submit a controlled matching response.
Open the target risk's evidence and check the title, evidence type, answers and source-submission reference. If an action target was configured, check that association as well.
For a reusable form, test responses that select different risks and actions. Confirm the intended target in each case, including the fixed fallback where one is configured. Use a risk that is eligible to receive evidence and give the submitting user the required RMS authority.
This action creates a note containing the answers and their source reference. Use the referenced submission to review the complete response and any original attachments. Review the evidence's meaning separately from the act of filing it; adding a note does not complete a mitigation or establish that risk has been reduced.
Product location: /qms/output-rules/{documentTemplateId}/rules/{ruleId}/actions/new (fallback: /qms/output-rules). Inspect the saved action, then check its intended output against the source submission.
First reopen the saved rule and action to confirm their template, type, active state, order and settings. Then use a controlled matching submission and inspect the resulting object or delivery. Test a non-matching submission as well to check that the rule does not run outside its intended condition.
The form response is saved before its outputs run. A failed action does not undo that response and does not necessarily stop later actions. Repeated submission can create repeated downstream work. Inspect what already exists before submitting again or recreating an apparently missing item.
When investigating an output, record the source submission, resulting object identifiers and relevant execution result. Check the actual destination as well as the configuration: a generated record, completed approval, delivered message and saved evidence each have their own outcome to inspect.
