Connect your identity provider with SAML 2.0 or OpenID Connect, copy ComplyTrain's service-provider values, test the connection, and decide whether everyone must sign in through it.
Single sign-on (SSO) lets people sign in to ComplyTrain with their organisation account, for example Microsoft Entra ID, Okta, Google Workspace or another identity provider. Your organisation has one SSO connection, using either SAML 2.0 or OpenID Connect.
Product location: /settings/users/sso. Open User Management in Settings, then SSO Configuration.
Who: only organisation Admins can open and change single sign-on.
Where: Settings, then User Management and SSO Configuration. The page is titled Single Sign-On (SSO).
Plan: SSO must be included in your plan. If it is not, the page shows Single sign-on is not included in your plan instead of the setup options: "Upgrade to set up SAML or OpenID Connect for your organisation. If you already have single sign-on configured, it keeps working — this only affects setting up a new connection."
Identity provider: you need someone who can register an application in your identity provider, and a test account there.
The SSO Status card shows Not Configured, Active, or Configured (Disabled), the protocol and provider name, for example "via SAML (Contoso Entra ID)", and Last tested: with Passed or Failed after a connection test.
Product location: /settings/users/sso. Open User Management in Settings, then SSO Configuration.
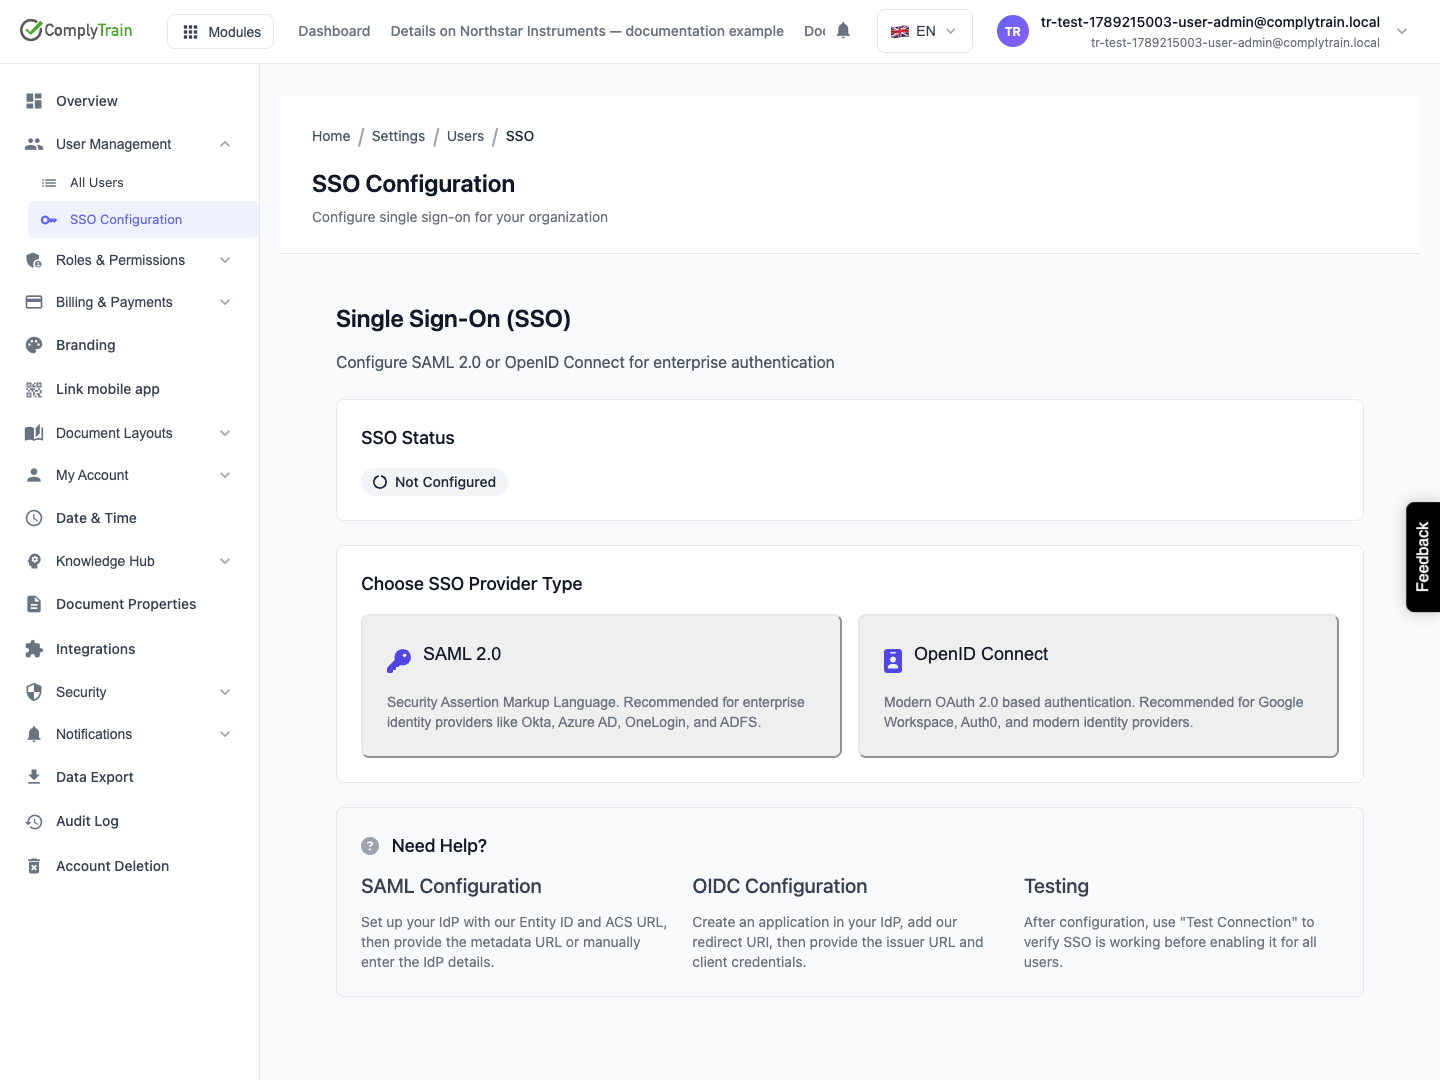
Under Choose SSO Provider Type, choose the protocol your identity provider supports:
SAML 2.0, recommended for enterprise identity providers such as Okta, Azure AD (Microsoft Entra ID), OneLogin and ADFS.
OpenID Connect, for providers such as Google Workspace, Auth0 and other modern identity providers.
The configuration form opens under the choice. Close it with Cancel or the close button to choose again; nothing is saved until you configure the connection.
Product location: /settings/users/sso. Open User Management in Settings, then SSO Configuration.
Your identity provider needs to know about ComplyTrain before the connection can work. The form shows the values to enter there, each with a copy button (Copied! confirms the copy). You can register ComplyTrain in the identity provider first and complete the ComplyTrain form afterwards.
ComplyTrain shows | Enter it in Microsoft Entra ID as | Enter it in Okta as |
|---|---|---|
Entity ID (Issuer) (SAML) | Identifier (Entity ID) | Audience URI (SP Entity ID) |
ACS URL (Reply URL) (SAML) | Reply URL (Assertion Consumer Service URL) | Single sign-on URL |
Redirect URI (OpenID Connect) | Redirect URI of type Web, in the app registration | Sign-in redirect URIs |
For SAML, have the identity provider send each person's email address as their identifier (name ID format email address) and sign its assertions. ComplyTrain recognises people by email address, so the address must match the one their ComplyTrain account uses.
Product location: /settings/users/sso. Open User Management in Settings, then SSO Configuration.
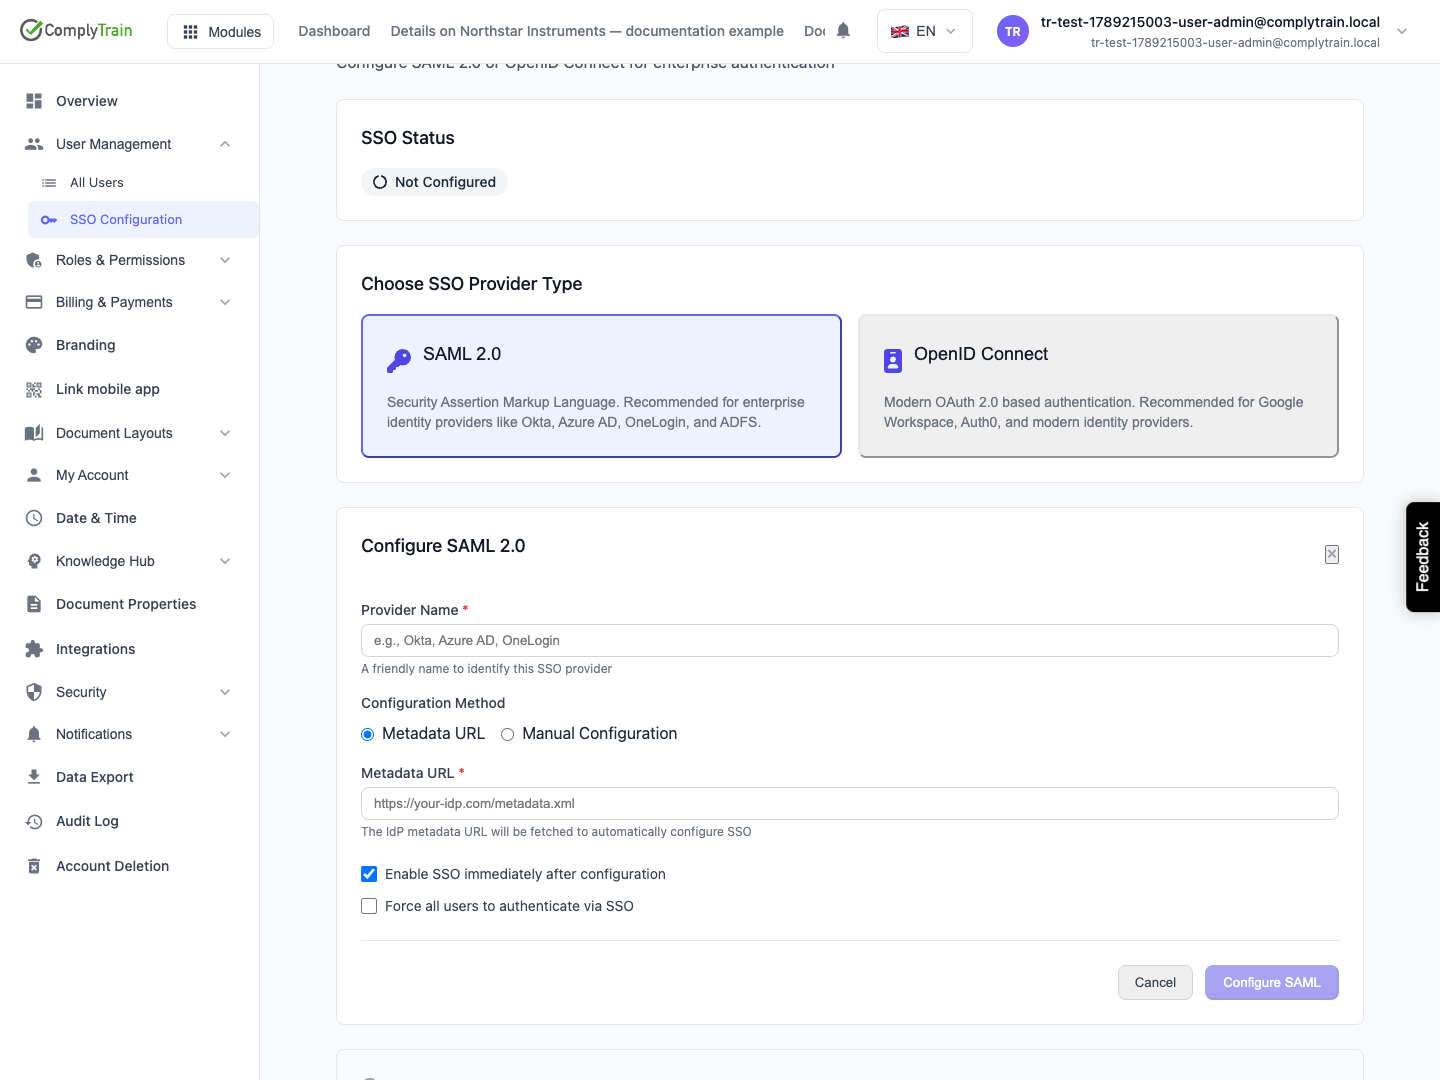
Choose SAML 2.0. Configure SAML 2.0 opens with Service Provider Details at the top.
Complete the fields below.
Choose Configure SAML. SAML Configured confirms the save, and the page shows the Configuration Details.
Field | What to enter | Rules and defaults |
|---|---|---|
Provider Name | A friendly name, such as "Contoso Entra ID". | Required, up to 100 characters. |
Configuration Method | Metadata URL or Manual Configuration. | Default Metadata URL. |
Metadata URL | The identity provider's federation metadata address. In Entra ID this is the App Federation Metadata Url; in Okta, the metadata URL on the application's Sign On tab. | Required with Metadata URL. Must be a valid URL. |
IdP Entity ID | The identity provider's issuer, such as the Microsoft Entra Identifier. | Required with Manual Configuration. |
SSO URL (Login URL) | Where people are sent to sign in, such as the Entra Login URL. | Required with Manual Configuration. Use an https address. |
X.509 Certificate | The identity provider's public signing certificate in PEM format, from | Required with Manual Configuration. Never paste a private key. |
Enable SSO immediately after configuration | Makes the connection available as soon as it is saved. | On by default. |
Force all users to authenticate via SSO | Requires single sign-on for everyone. See below. | Off by default. Needs SSO to be enabled. |
Product location: /settings/users/sso. Open User Management in Settings, then SSO Configuration.
Choose OpenID Connect. Configure OpenID Connect opens with the Redirect URI at the top.
Complete the fields below.
Choose Configure OIDC. OIDC Configured confirms the save.
Field | What to enter | Rules and defaults |
|---|---|---|
Provider Name | A friendly name, such as "Google Workspace". | Required, up to 100 characters. |
Issuer URL | The provider's issuer, exactly as it publishes it. Entra ID uses | Required. Must start with http:// or https://, up to 500 characters. ComplyTrain finds the provider's settings from this address. |
Client ID | The application (client) ID from the provider. | Required, up to 255 characters. |
Client Secret | The client secret from the provider. Use the eye button to check what you typed. | Required. "This will be securely stored and never displayed again." |
Scopes | The information ComplyTrain asks the provider for, separated by spaces. | Default |
Enable SSO immediately after configuration | As for SAML. | On by default. |
Force all users to authenticate via SSO | As for SAML. | Off by default. Needs SSO to be enabled. |
Product location: /settings/users/sso. Open User Management in Settings, then SSO Configuration.
Choose Test Connection on the SSO Status card. ComplyTrain checks the saved configuration and shows Connection Successful or Connection Failed with a summary, such as "All … test(s) passed successfully", or the check that failed. The result and time appear under Last tested:.
Protocol | What the test checks |
|---|---|
SAML 2.0 | That a metadata URL or all three manual values are present; that the metadata URL answers with XML metadata; that the certificate is in PEM format; and that the SSO URL uses https. |
OpenID Connect | That the issuer URL and client ID are present; that the provider's discovery document can be read from the issuer URL; and that the issuer it states matches the one you entered. |
The test checks configuration only; it does not sign anyone in. Before you rely on SSO, sign in with a test account in a private browser window and check that it reaches ComplyTrain with the expected name and access.
Product location: /settings/users/sso. Open User Management in Settings, then SSO Configuration.
Enable or Disable on the SSO Status card switches the connection on or off without changing any other setting.
Enable SSO?: "SSO will become available for user authentication." Choose Yes, enable SSO.
Disable SSO?: "Users will be able to log in with passwords again." Choose Yes, disable SSO.
SSO Updated confirms the change, and the status shows Active or Configured (Disabled). Disabling keeps the configuration, so you can enable it again later without entering it again.
While SSO is active, people can sign in through your identity provider with their organisation account. Unless Force SSO Login is on, they can also still sign in with a ComplyTrain password.
Product location: /settings/users/sso. Open User Management in Settings, then SSO Configuration.
Force SSO Login appears below the status while SSO is active: "When enabled, all users must authenticate through SSO. Local passwords will be disabled."
Test the connection and sign in with a test account first.
Tick Force SSO Login. Force SSO Login? explains: "All users will be required to authenticate through SSO. Local passwords will be disabled."
Choose Yes, confirm. Setting Updated confirms it. SSO stays enabled, and nothing else changes.
From then on, everyone signs in through your identity provider, including Admins, and signing in with a ComplyTrain password is refused. Make sure every administrator can sign in through the identity provider before you turn it on.
To allow passwords again, clear the box and confirm Allow Local Passwords?: "Users will be able to log in with either SSO or local passwords."
While Force SSO Login is on, Invite User and Import users (CSV) are unavailable to everyone who manages users, with the tooltip User management is disabled while Force SSO is active. People get their ComplyTrain accounts through your identity provider instead, as described next.
Product location: /settings/users/sso. Open User Management in Settings, then SSO Configuration.
When someone signs in through SSO for the first time and has no ComplyTrain account, ComplyTrain creates one for them in the Pending class, and every Admin receives a User awaiting access notification. The person sees Your access is pending until you assign a licensed or training seat in Pending users; see manage seats and account classes.
A person who arrives by following a link to a training course is given a training-learner seat straight away when one is free. People who already have an account keep it, with their class, roles and history.
Product location: /settings/users/sso. Open User Management in Settings, then SSO Configuration.
Configuration Details shows the saved values. For SAML: Provider Name, IdP Entity ID, SSO URL and whether a Certificate is Configured. For OpenID Connect: Provider Name, Issuer URL, Client ID, the Client Secret as asterisks, and Scopes.
To change the connection, for example when the identity provider's certificate or client secret is renewed, choose Reconfigure SSO. The form opens with the saved values, except the certificate and client secret, which you enter again. Save with Configure SAML or Configure OIDC, then test again.
To remove single sign-on entirely, choose Remove and confirm Remove SSO Configuration?: "This will remove all SSO settings. Users will need to log in with passwords." Choose Yes, remove SSO. SSO Removed confirms that the configuration has been deleted, and the page offers the protocol choice again. People keep their ComplyTrain accounts, classes and roles. Setting up a new connection afterwards requires SSO in your plan.
Product location: /settings/users/sso. Open User Management in Settings, then SSO Configuration.
Contoso wants everyone to sign in with their Microsoft work account.
In ComplyTrain, open SSO Configuration, choose SAML 2.0 and copy Entity ID (Issuer) and ACS URL (Reply URL).
In the Microsoft Entra admin centre, create an enterprise application for ComplyTrain, choose SAML single sign-on, and paste the values into Identifier (Entity ID) and Reply URL. Set the user identifier (name ID) to the user's email address, and assign the application to your staff.
Copy the App Federation Metadata Url from Entra ID.
In ComplyTrain, enter "Contoso Entra ID" as Provider Name, keep Metadata URL, paste the address, keep Enable SSO immediately after configuration and leave Force all users to authenticate via SSO clear. Choose Configure SAML.
Choose Test Connection, then sign in with a test account in a private browser window.
When the test user gets in, tick Force SSO Login and choose Yes, confirm. From now on, new colleagues are added in Entra ID, and you give them a seat in Pending users after their first sign-in.
